FeatureUp News
Loading...

Recent Post

Showing posts with label Tips. Show all posts
25+ Very Useful CSS Tips and Tutorials

25+ Very Useful CSS Tips and Tutorials


Cascade Style Sheet (CSS) is a very important part of any webpage. Using this language you can create some beautiful effects to adorn your website and most important it is not very difficult to comprehend.

It is a style sheet language which is used to describe the presentation parameters like the look and formatting of a document written in a markup language. It’s most common application is to style web pages written inHTML and XHTML, but the language can be applied to any kind of XML document, including SVG and XUL.

With the introduction of CSS3 you can create a lot of new and exciting features like shadows, animations, transitions, border-radius etc. The effects which were made in Photoshop can easily be made here using CSS3 with use of jQuery and little JavaScript.
We have listed below 25+ exciting CSS tips and its features which you can easily create and add to your webpage to give it a new elegant look.

25+ CSS Tips and Tutorials

CSS Image Styles

You can add any style to the background-image with proper rendering using the CSS image styles. In this tutorial you will use jQuery to make perfect rounded corner images dynamically using image CSS trick. You can use use box-shadow, border-radius and transition to create various image styles.
CSS Tutorials
Download Source

Snazzy Hover Effects

In this tutorial, you will be learning to create flexible advanced hover techniques using CSS2.1 properties. You will find caption text to appear over the top of images and information about the image you moused over or focused on.
CSS Tutorials
Download Source

Create a beautiful icon with CSS3

Thus tutorial teaches you how to create a document icon with pure CSS3. You start off with a square box then you round the edges and use pseudo elements to create curled corner and finally you will create the illusion of text with a stripped gradient.
CSS Tutorials
Download Source

Semantic Animation

This is an animation tutorial of a moon rising, and as it rises the sky and ground turn to black. You will need two elements to accomplish this animation. The animation will make your website to be in motion.
CSS Tutorials
Download Source

Animated Mario Block Navigation Menu

This tutorial contains some good clean fun by recreating the animated Mario Bros. question mark box with pure CSS3. You’ll also learn how to use several cool CSS3 technologies such as rounded corners, box and text shadows, and keyframe animations that work in both Safari and Firefox.
CSS Tutorials
Download Source

Create an Apple-Style Input Field With Display Labels

This tutorial builds a small Apple-styled input form with some basic structure and scripting. You will use jQuery 1.4.1 library to support the display label functions. All code included is based off XHTML Transitional Doctype and uses CSS2/ CSS3 techniques.
CSS Tutorials
Download Source

Create Presentation Slides with HTML and CSS

This tutorial contains code for creating slides to show for presentations. It can be useful for your business purpose or even for web sites.
CSS Tutorials
Download Source

Custom CSS Cursors

Here you will find the various default cursor icon associated with a particular element which you can use in your interface. It contains more than 20 cursor icons. Some works on all browers while some are restricted.
CSS Tutorials
Download Source

Stylish Rocking CSS3 Search Field

Here you will create a search box using CSS3 with rounded corners and a search button by applying new styles to the box and button.
CSS Tutorials
Download Source

Create Diagonal Lines with CSS

In this tutorial you will learn to draw diagonal lines which acts as a border. You can use this in diagonal bordered tabs and can include easily in the project
CSS Tutorials
Download Source

Create a Modern Ribbon Banner Navigation Bar with Pure HTML/CSS3

Here you will learn how to create a centered ribbon banner with pure CSS3 using a step by step procedure. You can create modern design elements without the adept knowledge of graphics tools
CSS Tutorials
Download Source

create slick effects with CSS3 box-shadow

In this tutorial you will create drop shadows and inner shadows effects in the box using pure CSS3. Now no need to go for Adobe Photoshop’s blending options. You will use box-shadow property allows you to add multiple shadows (outer or inner) on box elements.
CSS Tutorials
Download Source

Slick login form using HTML5 & CSS3

Using this tutorial you can create stylish login form without the use of any javascript code. You will find the stitch effect and paper stack effect in the login form
CSS Tutorials
Download Source

Create Script-Free CSS3 Tooltips

You can make really awesome tooltips out of pure CSS3 using this tutorial and can also create a mobile friendly version using little javascript
CSS Tutorials
Download Source

CSS3 tables with rounded corners

: In this tutorial you will learn how CSS3 and tables can work together to create some cool and usable results in the tables. You can do rounding of corners with no images and giving this effect will definitely add the beauty to the table
CSS Tutorials
Download Source

Create a CSS3 Tabbed Navigation

Here you will be creating the CSS3 tabbed navigation. You will work with the darkwash jean version out of the many different themes available for awesome tabs.
CSS Tutorials
Download Source

BUILD A PURE CSS 3D CITY

This tutorial teaches you to build a 3D city with six buildings. Buildings are easy and are just cubes with a fancy texture with each building being composed of 5 sides
CSS Tutorials
Download Source

CSS3 enhanced zoom-in zoom out slideshow

In this tutorial you will create a clean zoom-in zoom-out slideshow. Here you will use stylish CSS3 effect to your slideshow simply by setting the style attributes corners to any or all four image-corners, furthermore you can apply shadows. You can also comment on each slide
CSS Tutorials
Download Source

CSS3 tabs with beveled corners

In this tutorial you will learn how to create some good looking tabs with beveled corners using a clever CSS3 gradients technique.
CSS Tutorials
Download Source

DYNAMIC PURE CSS 3D TEXT

Through this tutorial you can get a nice 3D effect combining multiple levels of text-shadow using the CSS. You can also add some CSS transforms, and dynamically rebuild the text-shadow to get a nice mouse-following pure CSS canvas-free 3D text effect.
CSS Tutorials
Download Source

Create a CSS3 Wheel Menu

In this tutorial you will create an awesome, layered CSS3 wheel menu using a few beginner to advanced CSS techniques. There is also a little bit of optional Javascript so that you can rotate your images depending on the hovered menu item.
CSS Tutorials
Download Source

Create a Swish CSS3 Folded Ribbon in Five Minutes

In this tutorial you will find how to create swish folded ribbon by simply taking one line of markup and a couple of CSS3 rules (no images) and you can create this effect within five minutes.
CSS Tutorials
Download Source

Create Pure CSS3 Ticket-Like Tags

During this tutorial you will use CSS3 to create ticket-like tags, without relying on any images just by creating HTML markup and styling main tags and four corners with a punched hole in the tag giving a ticket look.
CSS Tutorials
Download Source

Rotate and Mask Thumbnails With CSS3

This tutorial teaches you how to showcase the rotated thumbnails using the CSS. It’s a simple effect that adds a layer of visual personality. This effect will represent image galleries with rotated thumbnails.
CSS Tutorials
Download Source

Pressable CSS3 Social Buttons

Get a quicktip to create some really awesome press-able social media buttons using pure CSS3. These cool buttons can be placed on any project.
CSS Tutorials
Download Source

Font Face Deisgn Guide

This tutorial explains the common issues with using custom fonts, picking the matching fallback web safe fonts, and how to create a perfect fallback font style with Modernizr. You can adjust the styles for the fallback font (size, letter-space, weight, text-transform, etc.) to best match the custom font.
CSS Tutorials
Download Source
How to Play PC Games without having High Graphic Card

How to Play PC Games without having High Graphic Card


play-pc-games-without-graphic-card-featureup


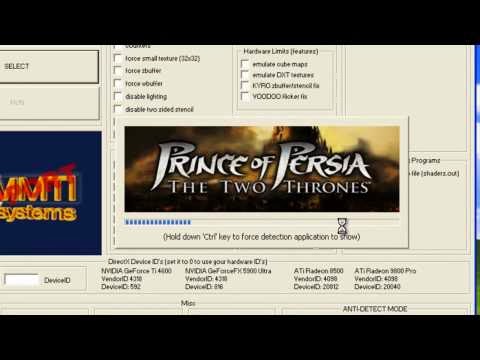
Download 3D-Analyzer Tool for Windows.

Now it's a .zip package so make sure to extract the package to get .exe file.

So now as you will open this tool you will see a big Select button, simply press that too choose your game file.

So make sure to navigate to the original game directory and select the .exe file of your game you wish to play.

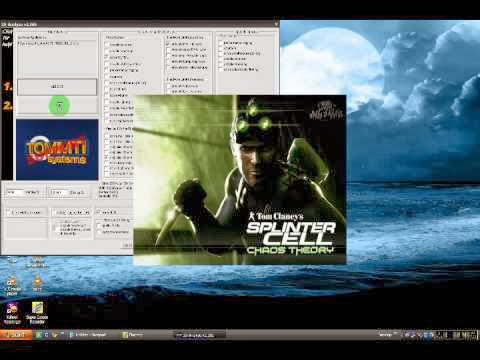
Now after selecting that game make sure to tweak settings as mentioned below in the image, just select every setting like below.

Now after configuring the whole software, just press "RUN" option and then just wait and see how your game runs automatically.

Remember You can even save the batch settings for every single using the Save Batch File! option provided below in the tool.

play-pc-games-without-graphic-card-featureupplay-pc-games-without-graphic-card-featureup

So now every single person who do not want to waste money on graphic card for a playing a single he can easily rely on this tool for making that game run pretty easily. Well but I surely recommend that if you are a gaming freak then you should have all the tools and software's required for awesome gaming experience.

7 Working OnPage Optimization Factors that Boosts your SEO

7 Working OnPage Optimization Factors that Boosts your SEO

Considering OnPage Optimization Factors will really helps to boost the ranking of a website and at the same time it is the crucial part of Search Engine Optimization (SEO). Hope this article helps you to rank well for a particular keyword that you are targeting for. There are several websites or blogs that shares information regarding OnPage Optimization factors. But few are confusing and few are bored in my opinion. I won’t say implementing these below factors will boost your SEO for sure. But it definitely strengthens your SEO for better ranking.

best--tips-for-onpage-seo-featureup

Boost your SEO with 7 OnPage Optimization Factors

I personally use the following methods on most of my blogs and it works fine for me. These 7 SEO factors are listed according to latest Google Algorithm changes. Here you go..
1. Use Heading Tags Smartly
Don’t you know what is Heading Tag? Let me explain in detail. Heading Tags in SEO (H1, H2, H3 etc.,) are considered as major factor where Crawlers will search for these tags all over the content and gives importance to the keyword covered inside these Headings. Use these tags effectively in order and avoid excessive H1’s (One H1 is preferred), few H2’s and multiple H3’s.
2. URL Structure
It is also called as Permalink structure. Make sure that your URL consists of direct targeting keyword instead of unnecessary terms like stop words. Since Google shows only some part of the URL in search results, best practice is to use primary keyword in the Permalink. Cross check that it should be short and simple.
3. Keyword Placement
In my view, it is the most important factor while considering OnPage Optimization. Primary Keyword should be placed smartly all over the content and it should look naturally and user-friendly. Follow the simple rule “Write for Humans not for Bots”. Most of the popular blogs are maintaining their keyword density between 1.5 to 2% which is good according to recent algorithm updates.
4. Effective usage of <b>, <u>, <l>
Do you love helping others? Then you should also help robots to find your objective of an article using these tags. Using bold, underline and italic tags to the focusing keyword will help crawlers to find the intention of what you are presenting to your readers.
5. Know the Importance of ALT Tags
100% On Page Optimization includes Images that are used in the article. Use atleast one related Image and use Alternate (ALT) text which is a text description for that Image. Here is the syntax using ALT Text for OnPage SEO.
<a img=”http://imagepath.com” alt=”Image Text Description”/>
6. Page Speed
Most of the webmasters won’t consider this as a major factor. But it really influences the search positions if your competitor has higher page speed value than yours. Some of the common factors for lower page speed are having excessive external objects, loading with JavaScript’s and having heavy Flash Objects. You can check your Blog Page Speed here.
7. Text/HTML Ratio
It means that you should justify both Text and HTML Ratio equally. Having more HTML with lesser Text affects your SEO to some extent. If you got this error by check with any third party tool, add some more text and maintain more than 15% Text/HTML Ratio which is great.
Do you have any points to add with me? Why can’t you add through comment form? Hope these 7 OnPage Optimization Factors helps you to boost your SEO. Happy Blogging!!
Tutorial: How to gets Headphones working with Sony Xperia Z Ultra (SOLVED)

Tutorial: How to gets Headphones working with Sony Xperia Z Ultra (SOLVED)

Tutorial: How to gets Headphones working with Sony Xperia Z Ultra (SOLVED)-FeatureUp

Boy, have headphones changed in the last few years. From something that was simply a black wire that split into 2 earpieces, they’ve morphed into a plethora of options and varieties with an assortment of buttons, sliders, and connections, each meant to make your music experience a little bit more convenient. And with the addition of OEMs designing and creating earphones for specific device models, compatibility issues may arise when you plug them into a new device for the first time.

For Sony Xperia Z Ultra users, XDA Forum Member Pannam offers up a potential fix for issues with headphone / device incompatibility where certain buttons do not work on some devices. The fix basically consists of a simple tweak of a system value labelled headsethook. But first, you must install the provided keytest.apk and with it, find the numerical scancode of your headset. Once that’s done, simply change the headsethook value to the scancode of your headset. You then change the headset scancode to the original headsethook value, and install a third party headset app.

Tutorial: How to gets Headphones working with Sony Xperia Z Ultra (SOLVED)-FeatureUp

Tutorial: How to gets Headphones working with Sony Xperia Z Ultra

1. Get backup of your Sony Xperia Z Ultra before doing any process.

2. Your Sony Xperia Z Ultra must be rooted.

5. Now connect Handset to Xperia Z Ultra and open KeyTest now click any buton.

6. Scancode will appear over there notedown that code ( i.e : 257 )

7. Now Browse to system/usr/keylayout/msm8974-taiko-mtp-snd-card_Button_Jack.kl (use rootbrowser)

8. You need to search HEADSETHOOK

9. Now replace key with scancode number.

10. It should be look like this
    #original: key 226 HEADSETHOOK WAKE
    #changed: key 257 HEADSETHOOK WAKE

11. Now change the scancode number, in my case key 257 to 226 (or the key HEADSETHOOK is assigned to)

12. It should :
    #original: key 257 VOLUME_UP WAKE
    #changed: key 226 VOLUME_UP WAKE

13. One more app will reqiuired to finish process Download Headset Button ControllerTrial

14. Restart your Sony Xperia Z Ultra and Configure buttons as per your wish.

Best of Luck ! I hope it was helpful. In case if you got error or you don't know what to do next just leave one comment we would like to help our reader. -- Yes don't forget share this post with your friends.
10 Best Windows 8 Themes, Visual Styles and Skins

10 Best Windows 8 Themes, Visual Styles and Skins

Bored of Your Windows 8 Computer Desktop screen ? Get these best Windows 8 Themes and refresh the look of your Windows 8 screen. Microsoft has made many design changes by introducing Metro UI and Start Screen in Windows 8. But the desktop side of Windows 8 has not seen any dramatic changes except the removal of Start Menu and Aero Glass Transparency feature.
Redmond giant has introduced a new Windows Theme pack file type (.deskthemepack) exclusively for Windows 8 which has metro style themes and 360 degree panoramic Windows 8 Themes. Windows 7 and prior operating systems won’t support this new file type and hence if you are Windows 7 user, you can’t install Windows 8 Themes. However, Windows 8 users can install Windows 7 themes in their system. Try this fix to install Windows 8 Themes in Windows 7

Here, We have handpicked the fresh and beautiful best Windows 8 Themes, Visual Styles and Skin packs to decorate your Windows 8 system. These custom Windows 8 Themes includes awesome wallpaper backgrounds, icons, dark skins.
By default Windows 8 blocks third-party Windows 8 Theme installation. To get rid of this, you have to patch your Windows 8 system files. For that,
Read our Previous Guide to Install the Custom 3rd party Windows 8 Themes in your system.

1. Base for Windows 8

base-for-Windows-8
Base for Windows 8  is pixel perfect quality Windows 8 Dark Theme which offers a nice set of Metro Icons and dark style skins.

2. Snowy V 3.0

Snowyv3
Snowy is a nice Glossy Windows 8 Theme which supports all colors of Windows 8. Snowy has the Minimalistic design and looks soft for eyes.

3. WhiteDior

whitedior
WhiteDior is nice Minimalistic Windows 8 Theme With icon sets and skins.

 4. Simplex

SImplex
Simple Windows 8 theme which features a new frame, search & address bar, taskbar, and various of other changes.

5. Chromium

Chromium-Style-Windows-8
Transform your Windows 8 system Google’ Chromium OS Style.

6. Gray8 Color Pac – Black Windows 8 Theme

greay8
Gray8 is the Stunning dark Windows 8 theme with transparent windows. This is one of the best Dark Windows 8 Theme avilable for Windows Systems.

7. Space Blueberries 4.8

Space-Blueberries
Space Blueberries is an awesome Windows 8 theme which has dark shadowed visual style and has design tweaks.

8. Work for Windows 8

work
Work is one of the best Windows 8 theme which has glowing dark interface.

9. Aero8 Glow

win8aero
Aer08Glow is a port of the default Windows 7 theme with a few modifications. This theme has glow on the caption buttons and 2 styles: one with square corners and one with rounded corners. To use this theme with rounded corners you have to enable Aero Glass Transparency in Windows 8.

10. Glow Dark

Glow-Dark
Glow Dark is also one of the Dark Windows 8 Theme available for Windows 8 users.
Best Windows 8 and 8.1 Essential Guide

Best Windows 8 and 8.1 Essential Guide


Windows 8 Operating System has changed the Windows users Computer experience to the new level. Windows 8 has lost the Trademark Start Button, Start menu and got the New Metro Apps with stylish Start screen and more. These multiple changes have been made to bring the Mobile computing experience to the Desktop Users. It’s because, the whole world is changing to Smartphones, Tablets and so on. To catch these Mobile Market, Microsoft has taken the bold step and bring the much polished and advanced Windows 8.
Now, the Windows 8.1 has also out to the market that fixed and enhanced the issues in Windows to please the Windows loyal users. However, You need some handful guide to use the Windows 8 and 8.1 to get the Premium Computing experience. Windows 8 has two customizable interfaces, one is familiar Windows Desktop and Other One is Live Tiled Modern Start Screen. This dramatic change in Windows needs the steep learning curve to understand the things better.
This is where our Windows 8 / Windows 8.1 Tips and Tricks complete guide comes in and will take you to inch closer to this modern Operating System. Windows 8 guide also applies to Windows 8.1. Since Windows 8.1 is an Update of Windows 8.

Windows 8 / 8.1 Tips and  Tricks

1. Top Windows 8 Keyboard Shortcuts

Windows 8 has changed the tradition of Windows by Introducing the new Interface and has brought many aesthetic features. So, Windows 8 has got some new shortcuts that will be useful to you to make things easier. Let’s see the new windows 8 Keyboard Shortcuts,
WinKey + C = Will Open the Charms Bar
WinKey + F = Search Files
WinKey + W =Search Settings
WinKey + Q = Windows 8 Search Field
WinKey + I = Opens the Settings Menu
WinKey + D = Opens the Devices menu
WinKey + H = Brings the Share Menu

2. Access All Settings in Windows 8 with “GOD MODE”

God-Mode-Windows-8-Guide
Windows 8 and Windows 8.1 has many basic to Advanced Settings that can be used to control and Tweak your system. However,  accessing the all settings in Windows 8 under the one roof is not available. Even though, you are the Geek, You can’t remember all those settings in Windows 8. They can be organised into one handy folder that is called “God Mode” by the Users.

How To Create God Mode in Windows 8 and 8.1

Creating the God Mode needs few steps,
1. Open the Windows Explorer, and tick the Check Box “Show File Name Extensions and Hidden Items”.
2. Now Create the New Folder in Anywhere and Rename the folder by Pasting the Following text as it appears
GodMode.{ED7BA470-8E54-465E-825C-99712043E01C}
3. That’s it, Now You will get the Control Panel Icon and Opening that will fetch all the settings that available in your Windows 8 System including Administrative Settings.

3. Directly Boot to Windows 8.1 Desktop

Windows 8 / 8.1 TIPS
Windows 8.1 offers the two Interfaces: Start Screen With Apps, Traditional desktop. Windows 8 always boot into the New Start Screen, there you can access the Desktop. Windows 8.1 offers the Boot to Desktop Feature, which will give you the option to directly boot into Desktop rather than the Metro UI.
To Access the Boot to Desktop Option,
Right click or Tab on the Empty Space of Taskbar and Open the Properties. A Pop up window will open with Tabs. Now, Select the Navigation tab, there Under the  Start Screen, Tick the Checkbox showing “When I Sign in or Closing the Application On a Screen , go to the Desktop instead of Start”.
Hereafter, Whenever you sign in or closing the App, you will be taken directly in to the Desktop bypassing the Metro UI.

4. Sync Everything and Access Anywhere

In this latest Windows Operating System, Microsoft has integrated the Online Accounts of Hotmail (Outlook), Live and Other MS Accounts. To access all Microsoft Online Services, you have to sign in to any of the above account. This integration has brought many online and cloud services to Windows 8 and 8.1. Your favorites, email, One Note and other Data are synced with all your devices including Android and iOS.
Just setup Your own Microsoft Account with Local account in Windows 8 system. It will get you a lot of services and flexibility. This also enables the SkyDrive Cloud Storage Integration in your Windows 8 system. You can access all your cloud files, also  Save the files through SkyDrive Storage from Windows 8.

5. Move the SkyDrive Location

SkyDrive is the Cloud Storage Service from Microsoft that has been deeply integrated in Windows 8. Moving SkyDrive to another location can be helpful for maintaining files. If you have more than one drive, SD card, then moving the SkyDrive will be useful.
To move the SkyDrive to Different Location in Windows 8 follow the steps below,
1. Open the Windows Explorer , in the navigation view, Right-click on the SkyDrive Folder.
2. Select the Properties from the menu.
3. Now, Select the Location Tab from the SkyDrive Window, and You can choose the move button to move the SkyDrive to different Directory.

 6. Get the Hidden Start menu in Windows 8.1

Windows 8.1 Start menu
Microsoft has removed the start menu in Windows 8, and most of the users miss that too. However, you can get the Start Menu in Windows 8 .1 that is you can emulate the Start Menu in Windows 8.1 using the Options available in the Taskbar. Windows 8.1 Operates differently than Windows 8. You can access the all apps screen by Swipe Up or Click on the down button on the screen. You can also get the Other option to get the All apps in Windows 8.1.
Open the Taskbar and move to the Navigation Tab and Tick the Checkbox of “Show the Apps view Automatically when I go to Start ” . Hereafter, Whenever you click the start button, you will be presented All apps views Instead of StarScreen.Though It’s not the Traditional Start menu, you can consider this as Modern Start Menu.

7. How to Shutdown Windows 8 and 8.1 Quickly

If you are the new to Windows 8.1, One thing you  may have noticed that You can’t Shutdown the machine so quickly like before you have done in previous Windows versions. However, an easy Workaround will give you the Metro Option in Start Screen.
For that Create the New shortcut in the Desktop  Screen. In the text field, type the ‘shutdown /s /t 10‘. The ‘t’ denotes the time delay in seconds in which your PC will shut down. You can change the time as per your wish. Then, Right Click on the Shutdown shortcut and select the Pin to Start option to show Shutdown in Start Screen.

8. Get the Admin Tools in Start Screen All Apps View

You may noticed that in the All Apps view, all of the Administrative tools are not present. You can get them by changing settings of Tiles. To Unhide them, Open the Charms bar and Select ‘Settings’ and then ‘Tiles’. There you can change the settings. Now, you will get all admin tool in all Apps view.

9. Lock Screen Notifications

Lock-Screen-Notifications-in-Windows-8
If you are a Smartphone user, Lock Screen Notifications are not new to you. Yes, Like you get the missed calls, Email, SMS Count in Lock Screen of mobile,  In Windows 8 and 8.1, You can get the same. You can also customize the Lock Screen notifications by adding and removing the Apps there.
To do that, in Charms bar, Select Settings and Open the “Change PC Settings”. if you are the Windows 8 user, Go to General Settings and Lock Screen. For Windows 8.1 users, Shortcut of Lockscreen image will be there already. In the Lock Screen Page, You will be presented a list of apps with ‘+’ Sign. Click the ‘+’ Sign to get more apps.

10. Your Picture on Lock Screen

You can change the Picture of Lock Screen like any Mobile Devices. To Customize the Windows 8 and 8.1 Lock screen,  Open the ‘Change PC Settings’ like above. Now Tab or Click the ‘PC and Devices’. You will now get a preview of your current Lock Screen with some options to Customize the Screen. Now, you can change the Background picture of Lock Screen from Your Computer, SkyDrive Images.

11. Use the Task Scheduler to Run Apps Automatically

Windows 8 / 8.1 TIPS
Task Scheduler is a Powerful Tool for Windows users. The Task Scheduler is the utility that enables you to automatically perform an action at a specific time or when something happens. For example, you can start your Favorite Programs automatically when you sign in to Windows 8. You can run the Maintenance tools and Anti Virus Applications at a specific time.
Open the Task Scheduler Tool and You will be presented with the ‘Create basic Task’ and ‘Create Task’. Choose the first one which is simple, and you can create tasks with the Task creation Wizard. Just follow the Wizard and complete the Schedule Tasks setup.

12. Make a Quick Search Using “Smart Search”

There are new ways of working with Windows 8.1. In the Start Screen, you will get  the Metro Windows 8 Apps, Settings and more. You can use the Smart Search feature to search anything offline and online. Windows 8.1 Smart Search is now powered by the Bing Search engine. It will show the web results with the Internal Apps and settings. To Perform a Search, Simply start typing in the Start Screen, the Results will be displayed from the PC and Web. Press H and the search Panel appears with app, settings and Files. In Desktop Mode, Press WinKey + Q to show SmartSearch screen.

13. Refresh Your PC

To Speed Up your Windows 8 and 8.1, Microsoft has added many new features to this Operating system. ‘Refresh Your PC’ is the important addition to restore your PC’s Speed like the Fresh Windows.
To Refresh your Windows 8 and 8.1 PC, Access your Charms Bar and then Click ‘Settings’ followed by ‘Change PC Settings’. There you can get the ‘Update & Recovery’ section with three options. One of the Option ‘Recovery’  is useful when you feel your system sluggish and hangs often. It will offer you three methods to fresh up your Windows 8 PC. Your System will be refreshed without affecting your Music, Videos and other files. The other Option should be only used at the last resort, it will completely remove your Windows and will start from Setup.

14. Create the Tile Groups With Name

In the Start Screen, the apps you have pinned will be displayed without any alignment. In Windows 8 and 8.1, You can create the group of Tiles for personalization. That is you can create the Group of tiles with name like ‘Social’, ‘Games’, ‘Fun apps’.
To Create the Tile Group in windows 8, right-click on the Start Screen and access the Customization option. Now the Tile Groups in the Start Screen will be faded, and text field will be shown for each group. You can reassign the tiles to any group and also you are free to create a new group as well. When you finished, left-click the mouse button on the blank screen will finish the naming of groups.

 15.  Secure Your PC with

Security is one of the essential thing which should be integrated with any device to safeguard your personal information. Microsoft has done a good thing by adding the Windows defender as a default App for removing unwanted files. In Windows 8 and 8.1, the Windows Defender is even more efficient, that monitors network behaviour as well incoming connection and outgoing connection. Add more protection by turning on the firewall which is essential to block malicious connections to your computer.

16. Protect Your PC with SmartScreen

SmartScreen adds another layer of protection to your Windows 8 and 8.1. Whenever you run the executable file that has been downloaded from the internet or from disk, if it has malicious or unrecognised certificates, the SmartScreen will prevent this apps from running.  You can also override the SmartScreen, if you know that the file is Genuine.
To Control the Smart Screen in Windows 8, Open the SmartScreen settings by searching the SmartScreen in the Charms bar. Now, you will get Two Results, ‘Turn SmartScreen Filter On or Off for Windows Store apps’, ‘Change Smart Screen Settings’.  Open the Smart Screen settings for the Advanced settings panel.

17. Run Multiple Apps in Windows 8 and 8.1

Though, this feature have some limitations, it is a useful feature for all Windows 8 users. You can view two or more apps in a single view . For example, if you have screen display of 1366 pixels wide, possibly, you can view the two apps or an app with desktop side-by-side.
If you want to show three apps, you need at least 1,500 pixels wide. Just Open the apps and drag them side-by-side to show two or three apps in a single view. Also note that, all apps are not designed for this view. Play with your apps and find out the apps that support this feature.

18. Run Windows 8 and 8.1 Directly From USB or Pen Drive

Windows 8 / 8.1 TIPS
Microsoft has introduced new feature ‘Windows to Go’, which will help you to create bootable Windows 8 USB Disk for enterprise edition. If you are Windows 8 Enterprise, use this fancy tool to create Windows 8 and 8.1 Live USB Disk. For other Windows 8 versions, you don’t have the fancy tool, however you can do it via command prompt.

To Create Windows 8 USB Disk in Windows 8 and 8.1

  • You need USB 3.0 Pen Drive with 32 GB Memory. USB 2.0 supported in some systems.
  • You also need Windows 8 Disc or ISO Image.
  • Next, Download  and install GImage X program for deploying the Windows files in USB Drive. You can do this in CMD, for easy to use, you can install Graphical Interface program.
  • Now, Open the GImage X program and move to ‘Apply’ tab.
  • Now mount the Windows 8 or 8.1 ISO file in your computer and copy the install.wim file to favorable location.
  • In the GImage X program, Select the install.wim file as source and your USB drive as destination.
  • Then, Click the Apply button.
  • Now Open the CMD  Admin (Press Win+X and Command Prompt), and go to the Directory  WindowsSystem32 
  • From this location, run the following command 
    bcdboot.exe X:Windows /s X: /f ALL
  • Note X: is the USB Drive Directory. So, change it to exact location when you run the above command
Now, your Portable Windows 8 Operating System is ready. You can install Windows 8 in SD memory Card, HDD by using the above method.

19. Improve the Performance of Windows 8 and 8.1 Using ReadyBoost

Windows 8 / 8.1 TIPS
Windows 8 and 8.1 is pretty heavy compare to its predecessor. You need to have bigger memory to play smoothly with your Operating System. If you are low on memory, it will be painful to work in your PC. Like the previous Windows versions, Windows 8 too have ReadyBoost to improve the Speed of the Windows 8.1 and 8. Utilize this feature and get a Faster Windows 8 system.
To use ReadyBoost, You need USB Flash Drive. Insert USB Drive and go to Computer, Right Click on the Removable Disk Drive and open the Properties. There move to the ReadyBoost tab and use your removable Device for ReadyBoost feature. There you can also select the memory to use the ReadyBoost function. If it is faster USB Drive, you will get more speed.

20. Configure the Mail App

You can send emails from Windows 8 using Mail App. You can configure Gmail, Outlook and other email Accounts and get the notifications real-time. You can keep an eye on the live tiles in start screen for the new mails. When you find the interesting content in mail app, you can directly to share  with social networks using the Share charm.
To Configure the One or Multiple Mail accounts, Open the Mail app from the Start Screen. Now Access the charms bar, Click Settings > Account. Now, Click Add account and Select the Email Provide from list. If your mailing provider is not in the list, select the ‘IMAP or EAS’.

21. How to Create Your Own windows 8 Theme

In Windows 8, You will have some default themes. If you want to create your own theme, add your own photos from the disk and make it with in few minutes. You can create as many themes you want to decorate your desktop. Other than this you can download many Windows 8 themes from online.

22. Customize the SendTo Menu

Windows 8 / 8.1 TIPS
SendTo menu is spectacular Feature not by Default,  but When you customizing it. Yes, Managing files and folders in the Windows 8 shouldn’t be the complex one. To make it more easy, you have to customize the SendTo menu. For example, Many users saving the files in Desktop for easy to use. Within few days, chunk of files will eat all your Desktop space, and it also doesn’t look beautiful. Now, You have to move files from Desktop to some other folders. to do that You have to copy and paste the files in respective folders. By the way, You can do this by adding your favorite folders in SendTo menu. That makes you possible that You can directly send any files to your Favorite folder with one SendTo Click.
To Customize the SendTo Menu in Windows 8 and 8.1,
  • Open the File Explorer and in Address bar type
    C:Users<User Name>AppDataRoamingMicrosoftWindowsSendTo
  • Then, Open the any Folder that Wish to add in the SendTo menu. Go back One Step to parent folder, and create the Shortcut for you favorite folder. The Shortcut will be created.
  • Copy that shortcut and place it in the SendTo menu folder that we have opened in the First step.

23. BitLocker Encryption

Windows 8 / 8.1 TIPS
If you are business person or you have some important data on your computer, encrypting them is the good thing to do. Windows 8 and 8.1 have the Microsoft’s proprietary encryption application which is built into Windows itself. If you want to encrypt your Windows Drive, Your PC has TPM Module Installed. Don’t worry ,If your system doesn’t have that, you will get slightly less secure mode compare to previous one.
Turning one the BitLocker is pretty easy, Search the BitLocker in Charms Bar. Click ‘Manage BitLocker’ to open ‘BitLocker Drive Encryption’ Window. Now, Click the ‘Turn On BitLocker’ next to your local Disks. Next, You have to choose the Authentication method. That is, You can use Smart Card or Password, if your PC doesn’t have TPM Module, you have to go password method. Now Choose Your Strong password. Then, you will get a prompt to store back up Recovery Key. You have four choices, 1. Microsoft Account, 2. Another USB Flash Drive, 3. As a File, 4. Print it manually.

24. Action Center

Windows 8 / 8.1 TIPS
Use the Action Center to check everything okay with your PC. If your PC have any issues, you can fix them in Action Center. Actions Center will check whether Firewall is on or off and will notify the important Windows Updates and some other things. If you have issues in your PC, Action Center flag will be shown with red mark. When you visit the Action center, the problems will be displayed the Red mark. You can fix those issues right there by clicking Turn On button, If you firewall is turned off. Like that, you can take necessary actions to run your PC Smoothly.

25. Defragment Hard Disk

You can get the maximum performance from Your PC, If you keep defragmenting the Hard Disk periodically. After long time usage, Files in your PC will be fragmented. The solution was to run the Disk Defragmenter manually. This find the pieces of files and put them back together, so that you can access theme faster.
You can Search the ‘Disk Defrag’ in Charms bar and Start the Defragmentation. You can also set the Schedule defragmentation for automatic defragmentation.

Quick Message
Press Esc to close
Copyright © 2013 FeatureUp All Right Reserved. The content is copyrighted to FeatureUp and may not be reproduced on other websites without permission or credit.